Initial concept
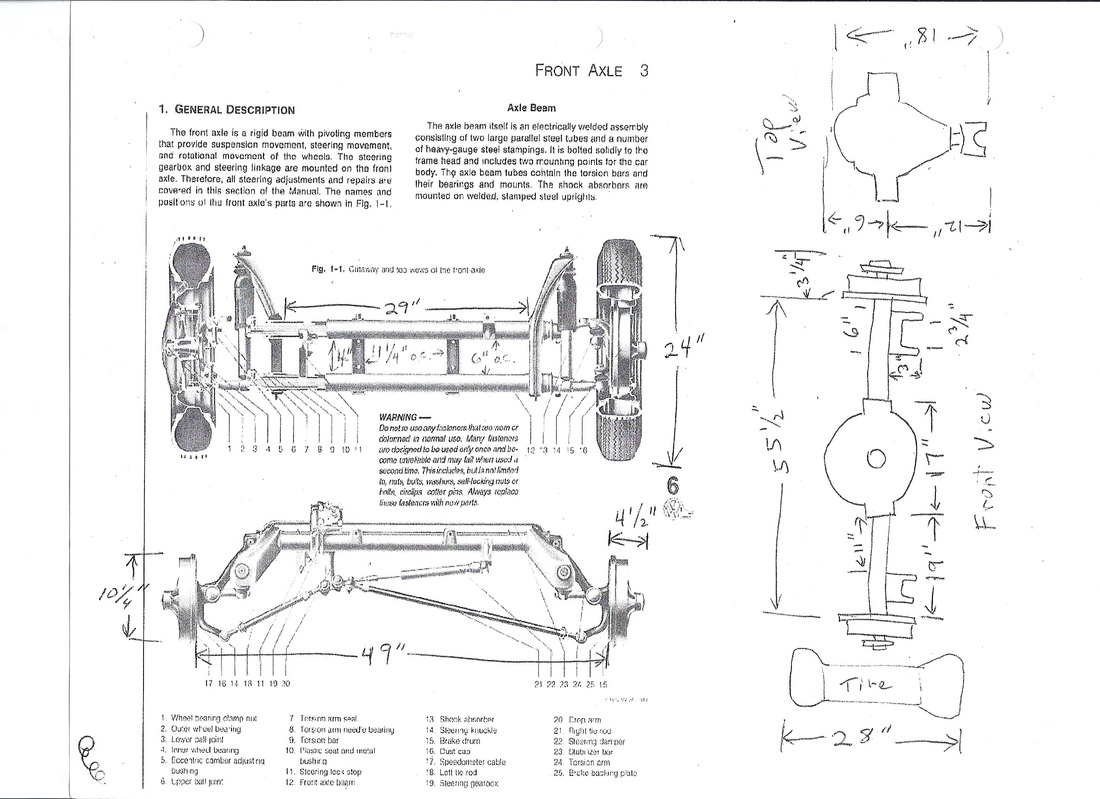
VW front beam (drawing from internet) and Camaro rear end sloppy sketch
I spent more than a little time over beers with friends talking about the original design. I struggled a little at first, but this is how the design came about. My buddy Dale is a dirt track race car driver, and he always has a bunch of left-over car parts. He races old Camaros, and offered up his parts collection for the cause. Originally he gave me both the rear end of a Camaro, and all the front end parts as well. The rear end looked great (2.54:1 ratio) but looking at the front end parts, it all looked pretty heavy, and complicated for me to reconnect. Sooo, one New Years Day I was out with some good friends at the local sand dunes, and was looking down at a sand rail and said "EUREKA! That's IT!" Sure enough, sand rails use old VW Beetle front ends (VW people call them "front beams", so if you want to use one of these, that's what you want to ask for). They are completely self-contained units, with steering box, tie rods and all! The extra bonus was that I could use the original VW brakes, and buy after-market dune buggy brake lines and parts to stop (important safety tip: good brakes!)
For the bike seats, posts, pedals etc. I scoured Craig's List for used bikes, and ended up cutting them up and welding on the parts I needed, and using the chains, bottom brackets and pedal cranks and freewheel hubs (that's what they call the chain sprocket part on bicycles that allows the rear sprocket to spin freely so you can coast). The freewheel hubs are critical, as they allow the pedaler to "coast" (big safety issue if the cranks kept turning while vehicle in motion; clothing caught; or, eek! body parts!).
For the bike seats, posts, pedals etc. I scoured Craig's List for used bikes, and ended up cutting them up and welding on the parts I needed, and using the chains, bottom brackets and pedal cranks and freewheel hubs (that's what they call the chain sprocket part on bicycles that allows the rear sprocket to spin freely so you can coast). The freewheel hubs are critical, as they allow the pedaler to "coast" (big safety issue if the cranks kept turning while vehicle in motion; clothing caught; or, eek! body parts!).
Driveline calcs....Ergonomics....
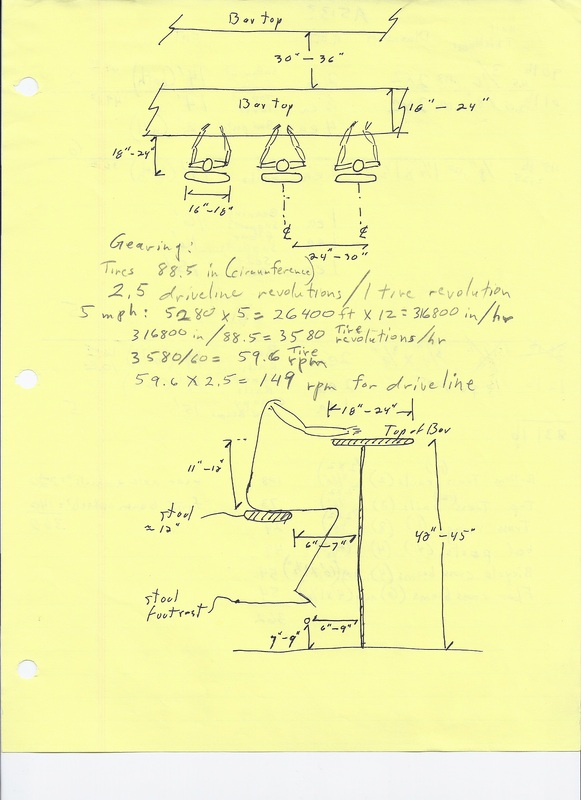
S, how did I know this design would work? Well, I didn't. But here are my calcs for the driveline (or so it went...)
Original design top speed of 5 mph.
Rear tire circumference was ~88.5 inches
Measured ~ 2.5 tire revolutions per driveline rotation
5mph=5280 ft x 5 mi=26400 ft. x 12 inches = 316,800 inches per hour
316,800 in per hr / 88.5 inches (tire circum.) = 3580 tire revolutions per hour
3580 rph/60 minutes = 59.6 tire rpm
59.6 tire rpm x 2.5 driveline revolutions = 149 rpm for driveline
At the gym I ride the exercycle. 50 rpm seemed very doable. So, by proper selection of bike sprockets, a 3:1 ratio would get us to 5mph at 50 pedal crank rpm.
Later, I found that the actual rear end gear ratio was 2.42:1. Very close! Also, 5 mph is too fast for what I cared about; running this thing with exuberant pedalers is like a Galley ship: hard to get everyone to row at the same pace! But the calcs seemed to work and had Les and Dale check them for me. See Eureka! video linked here: http://www.youtube.com/watch?v=GWKBT0R4tng&feature=youtu.be
Frame design...
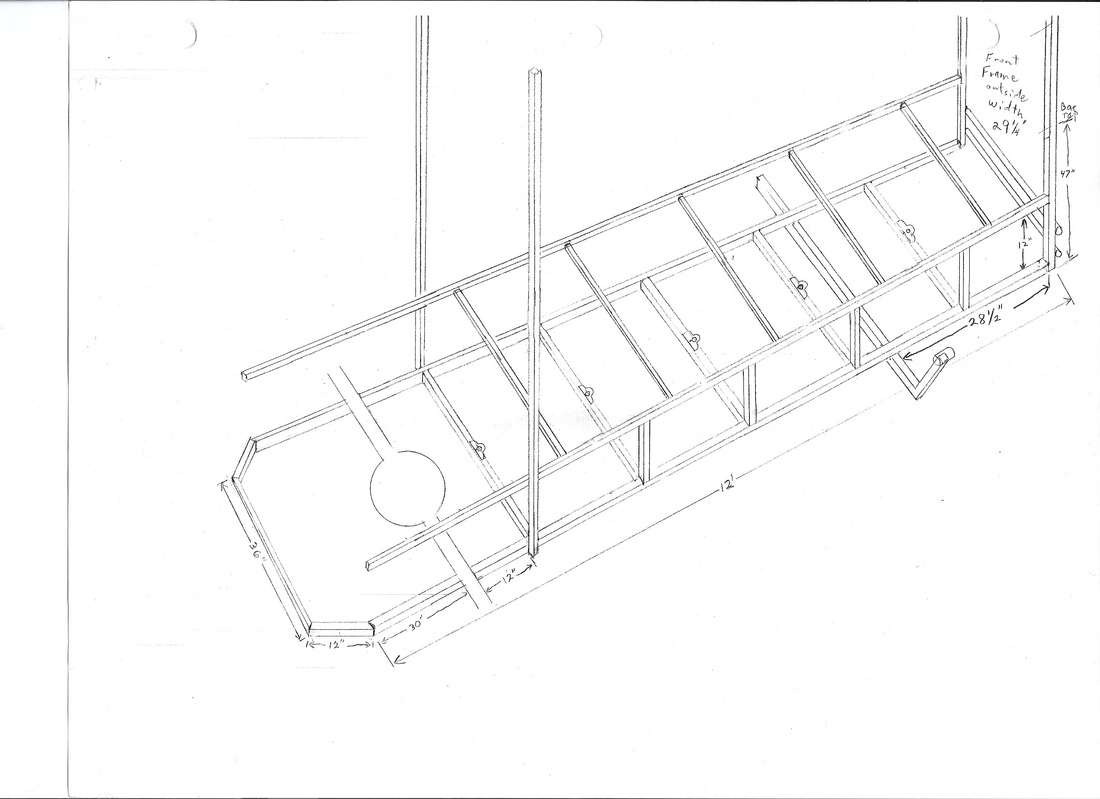
My original sketch of frame...
Well now, isn't that drawing a piece of crap? I scanned this in, but it was drawn on an 11 x 17 sheet of paper, so the lines barely show up (hopefully clicking on it will enlarge it). Anyway, this is how I started with the frame.
The idea to use a frame made of square steel stock (and driveline as well) concepts actually came from the AtomicZombie website. That site is devoted to building radical bicycles (and trikes, quads & ?). The founders Brad & Kat have all kinds of construction, welding and fabrication hints and tips, as well as extremely well-done plans on how to build many bike designs. That site was where I realized "I can do this". You should check them out! I bought several of their plans, as well as Brad's full-length book on building custom bicycles. His instructions are very clear and well illustrated with excellent photos.
I didn't want to build it quite like the Youtube Pedal Pubs, as they are like 2300 lbs, with what look like large beams and heavy lumber, so I took the truss approach (those sides that look like ladders laying on their sides). Ours weighs in at about 1000 lbs. as it is. A friend of mine is an engineer, and did a truss calculation for me to assure that the materials were strong enough for the load. The bottom rail of the ladder truss is 2"x3/16" square tubing, and the top rails are 2"x2"x1/8", and all the spanners are 2"x2"x1/8". The 3/16" wall stuff on the bottom truss rail was probably overkill, but that was just in case. Good thing, because I've counted as many as 16 people on it at one time!
Cross members
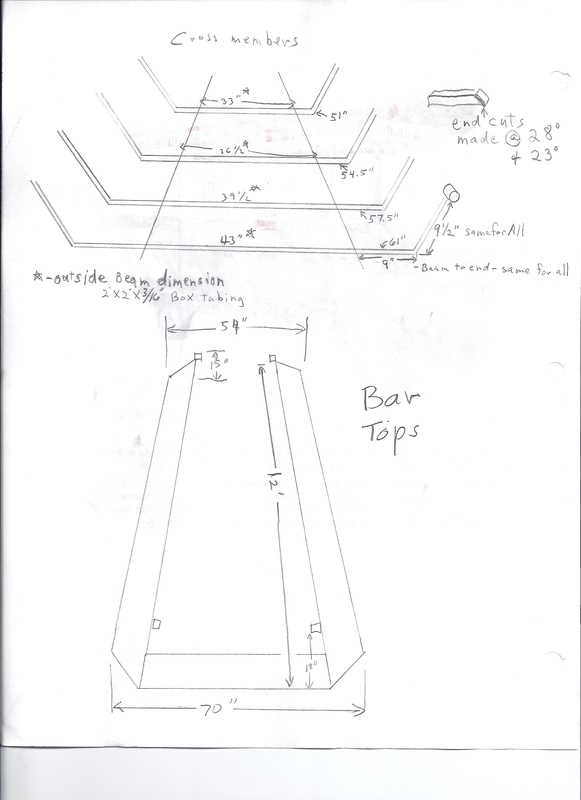
The cross members are 1 1/2" x 1 1/2" square stock with 1/8" thick walls. The bottom ones hold the pillow block bearings for the driveline, and the top cross members hold up the floor where the bartender, driver (and whoever else (o:) walk around. The four bike corners have vertical "bed posts," which are also the 2x2x1/8" stuff about 4' long. Those are important to hold up the bar tops and the shade structure canopy. I also put three pairs of 1" angle iron brackets across the bottom (not shown in the drawing) to rack mount deep-cycle batteries, 120 v. inverter, and the subwoofer for the sound system (o: which all reside under the floor.
Bar tops and support posts
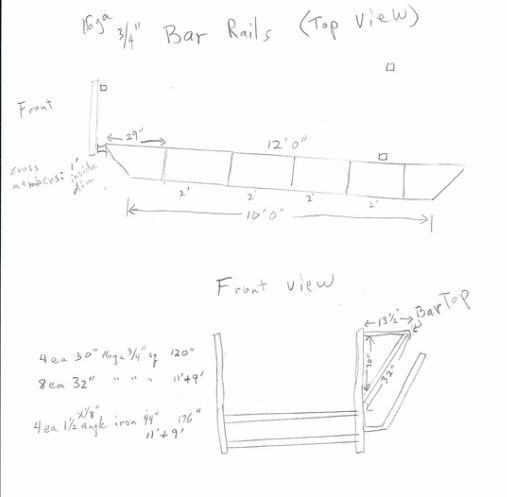
Bar top frame and front view of frame.
Dang! Another crappy drawing! The bar tops, supports and bicycle seat post supports are made from 16 gauge 3/4" square stock (16 gauge is roughly 1/16" thick walls). This stuff is pretty inexpensive, yet the finished bar tops are strong enough that people can sit on them (with the underneath supports, that is--see later pictures on the Construction page). After the frame was fabricated and welded on, we used a regular 1x12 plank for a bar top and painted it. I predrilled holes in the cross members to bolt the bar top to the frame. Also, note the odd bar width: 13 1/2"? This was so we could put a regular 1X12 plank down as a bar top, and still leave room for the pedaler to have the bar rail to hang onto, an alternative to a handlebar. Holly wrapped them with that black foam rubber pipe insulation that is slit down the side. It popped right on. She then taped it up with yellow tape. We also painted the foam rubber with yellow paint. That didn't work so well (o: Wore off pretty quick.
Weight considerations
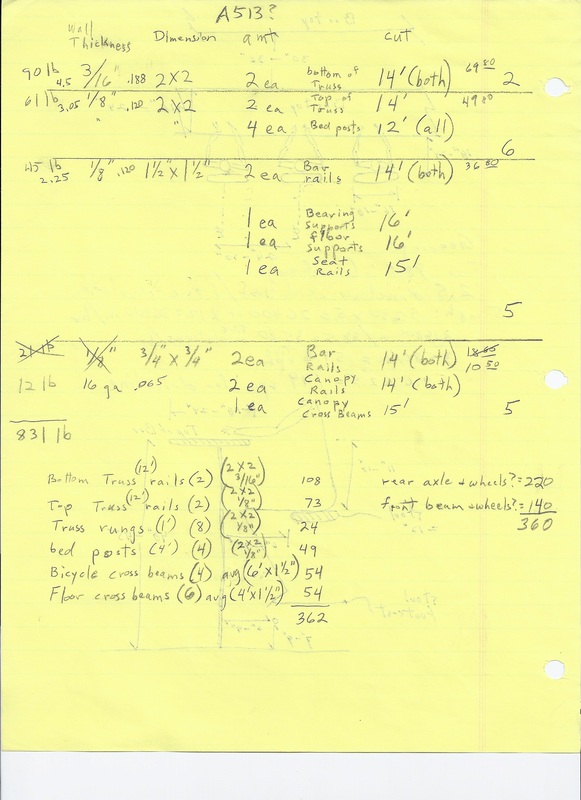
The thought of this thing being too heavy to move or be any fun always nagged me. This is my initial workup of steel needed and weight. I calculated unit weight per foot and (don't tell Holly) took the bathroom scale and weighed the wheels and axles:
VW Front Beam & tires: 140 lbs.
Camaro rear axle & tires: 220 lbs.
Total steel weight: 362 lbs.
Subtotal: 722 lbs.
This is a subtotal, because it doesn't include the bicycle posts, driveline, bar tops, canopy nor wood flooring. But it was a relief because I had read that the commercial version is ~2300 lbs. Good enough to press on! When asked, I tell people "about 1,000 lbs." Some day maybe I'll weigh it.
The Canopy
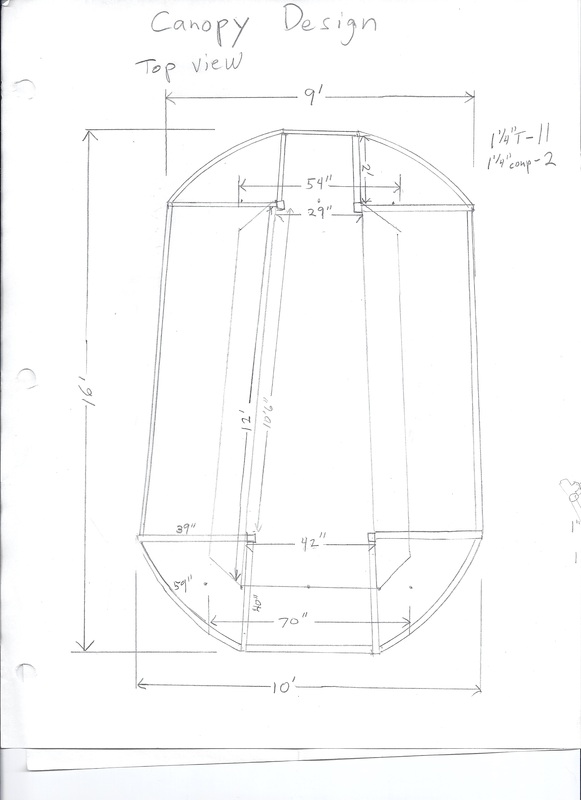
Top view of the canopy for the Pub
For structural strength, the frame by necessity is made of steel. To be lightweight yet strong, we made the canopy frame out of that white PVC water pipe available at the hardware and nurseries, used for sprinklers. And, it comes in many sizes. If you have never worked with PVC before, it is marvelous stuff. Not only can you cut and glue it into just about any length using couplings, tees, etc. but you can heat it and shape it! And it's cheap! Mistakes are no big deal.
When I decide on the shape of an object, if it is symmetrical (i.e., a circle, square, etc.) I draw it on the driveway with chalk to scale. If the end shape is free form curves, the first thing I do is take my garden hose and put it out in the sun, so it gets nice and flexible. Then I go to my driveway or patio and lay the garden hose down in a shape that I ultimately want my PVC to be formed. I then draw an outline along the garden hose with chalk, and remove the hose. I then follow the steps below to make my parts.
When I decide on the shape of an object, if it is symmetrical (i.e., a circle, square, etc.) I draw it on the driveway with chalk to scale. If the end shape is free form curves, the first thing I do is take my garden hose and put it out in the sun, so it gets nice and flexible. Then I go to my driveway or patio and lay the garden hose down in a shape that I ultimately want my PVC to be formed. I then draw an outline along the garden hose with chalk, and remove the hose. I then follow the steps below to make my parts.
Canopy ribs & frame
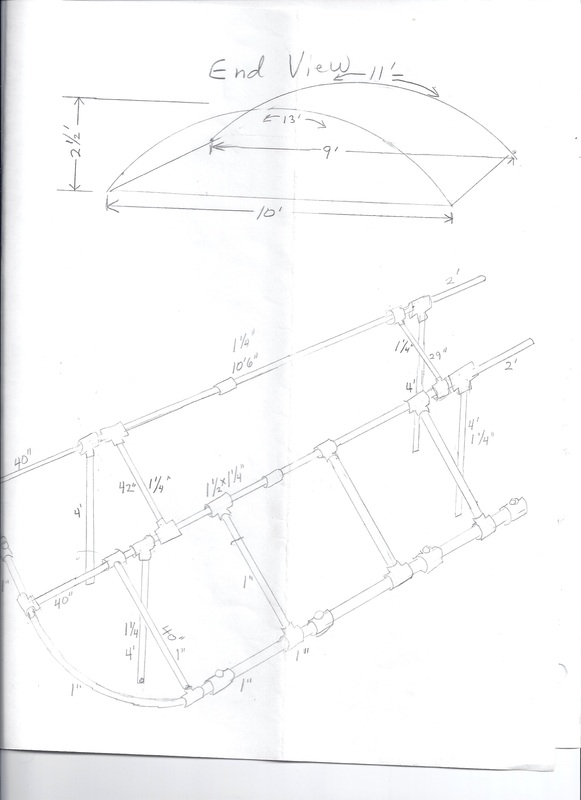
Another example of a sketch showing how the canopy frame would go together. There were a few changes along the way, but the basics are the same. Hopefully, clicking on it will enlarge the drawing.
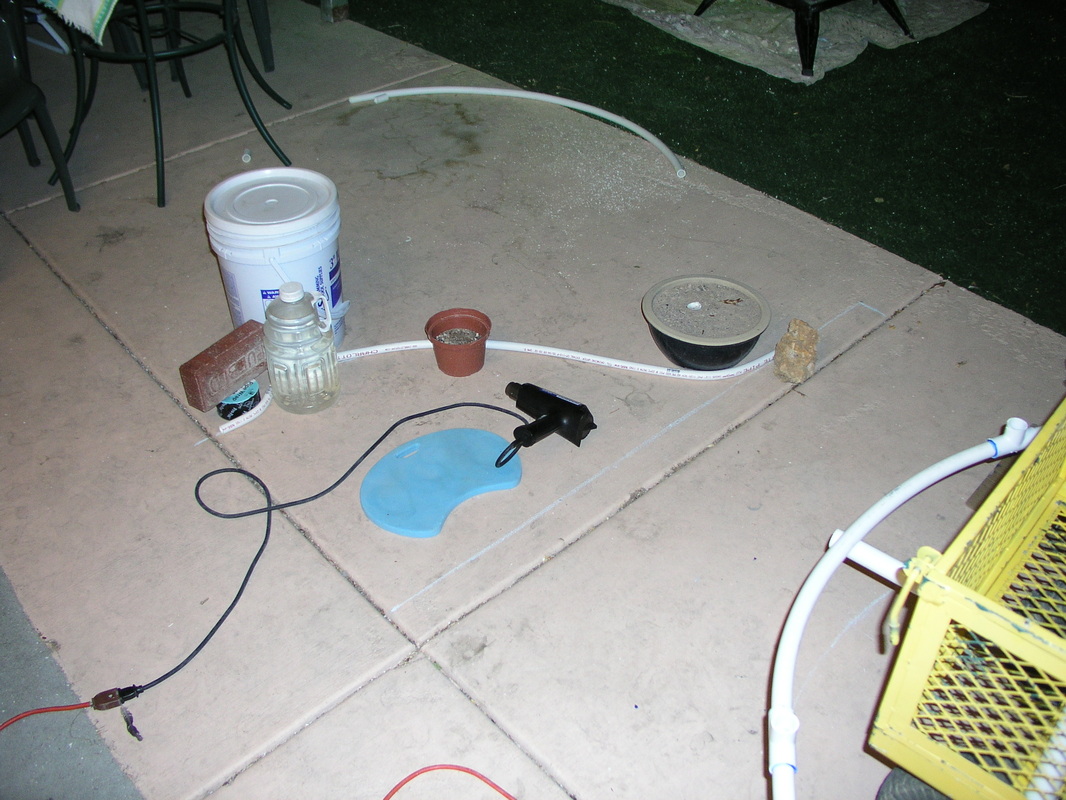
Example of heating/bending PVC
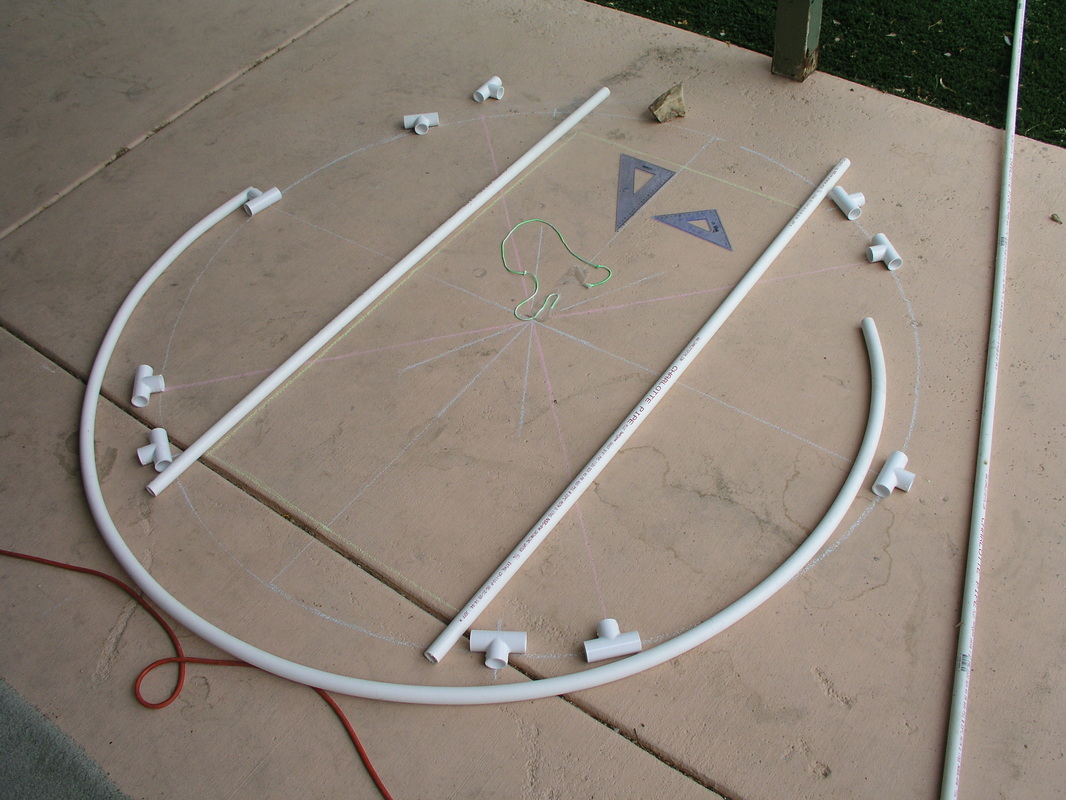
Earlier PVC project layout
I use a heat shrink gun (available from electronics parts supply houses). A friend of mine uses a hair dryer, but that takes more patience, as hair dryers are lower wattage and less heat output. Don't focus the heat in one spot, as you will brown or burn the plastic; move it slowly back and forth over 1 or 2 feet at a time. With a little patience it turns into a limp noodle like spaghetti. Bend it into the shape you want (i.e., along the chalk line you already traced), put heavy objects around it (bricks, flower pots, or rocks) to hold it in place, and leave it a few minutes. It hardens into that shape!
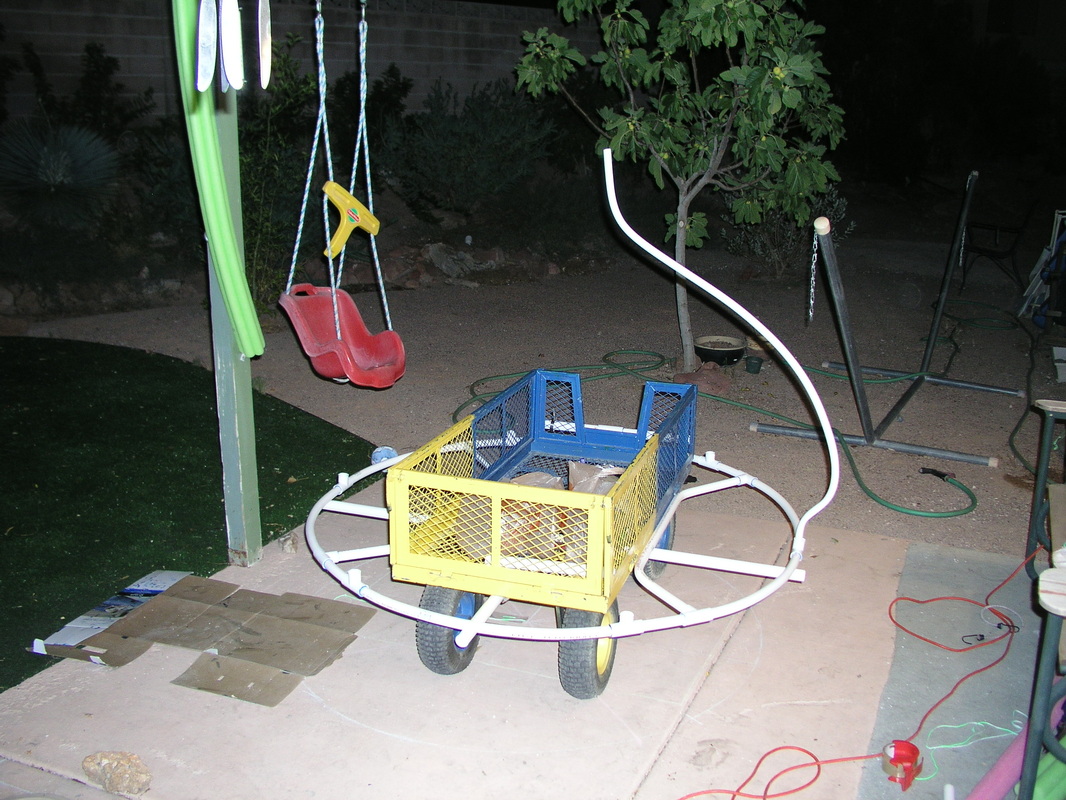
These photos are of a previous hookah pipe project I made out of our wagon (sorry. lost the finished photo, but hopefully you get the idea (O;) All this was done with cheap 3/4" sprinkler PVC and a few connectors! Holly then sewed up some fabric to cover it.
These photos are of a previous hookah pipe project I made out of our wagon (sorry. lost the finished photo, but hopefully you get the idea (O;) All this was done with cheap 3/4" sprinkler PVC and a few connectors! Holly then sewed up some fabric to cover it.